I'm excited to share the results of our latest Facebook Ads case study because I believe the approach we used to decrease cost-per-lead can be applied to everyone's Facebook ad campaigns!
You may wonder how big a decrease of 88% is …. well, it allows you to acquire nearly 7 times the number of leads for the same price you were paying for a single lead.
Imagine, instead of spending $1 and getting 1 lead, you spend that same dollar and get 7 leads!
So … it's freakin' huge!
I'll walk you through the data first; I'll then discuss the changes we made so you can apply them to your Facebook ad campaigns.
The Data
Overall

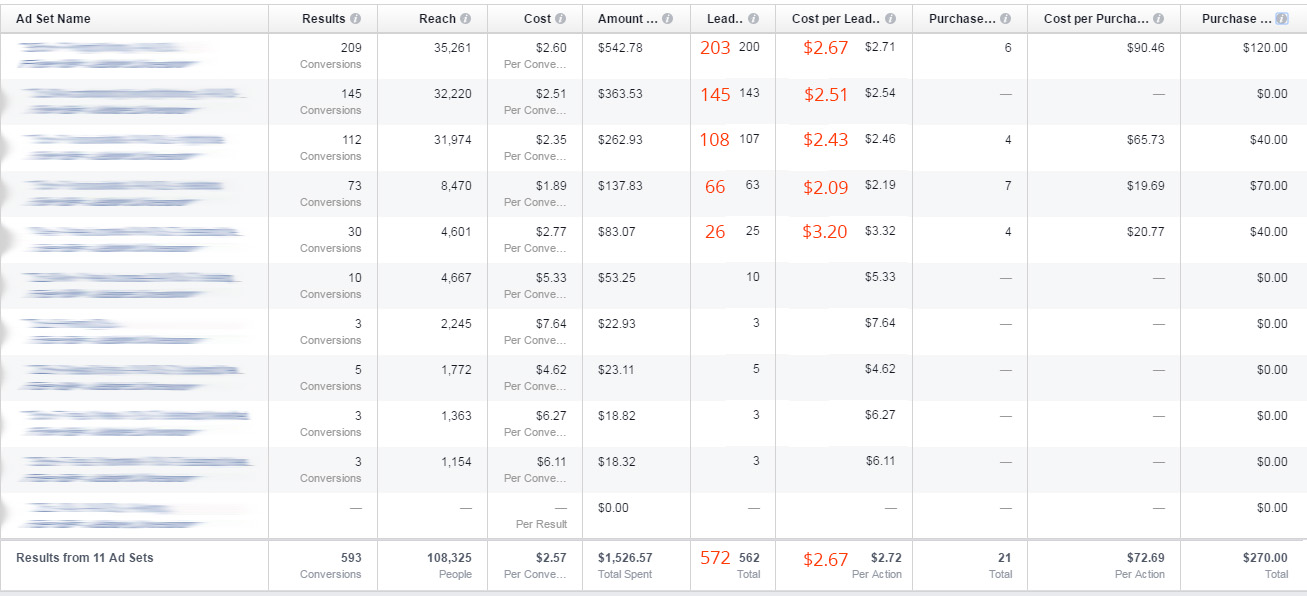
Note: They switched from the Old to the New Facebook pixel which resulted in the “loss” of 10 leads. I added the true numbers in orange.
Above are the “overall” results for the Before and After campaigns.
We'll get into the ad sets of each campaign in just a second; however, I want to point out a few things first:
- Amount Spent: Each campaign has spent over $500; these results are consistent and accurate. It's not like we spent $5 and got lucky.
- Cost per Lead: $0.32 vs $2.67 = 88% decrease in cost per lead!
- Purchase: These “cheaper” leads were quality leads – they were still buyers. Finding “cheap” leads isn't hard; however, if they don't buy then there's no point in collecting their data … the point of a lead is to eventually turn that person into a paying customer.
- Cost per Purchase: $12.91 vs $72.69 = 82% decrease in cost per purchase (also insane!)
Note: The “Purchase” data needs to be taken with a grain of salt. These numbers reflect sales made directly off the Thank You page (front end sales) and do not reflect sales that resulted in the back end. So, technically, the number of purchases is higher, cost per purchase is lower, and purchase volume is higher.
Before

Note: They switched from the Old to the New Facebook pixel which resulted in the “loss” of 10 leads. I added the true numbers in orange.
The image above shows all of the ad sets in the “Before” campaign. Each ad set targeted a different audience and/or device/placement. They used the same ad (a boosted post) for all of their ad sets.
These ad sets were essentially a hodgepodge of various audiences and placements as opposed to a systematic setup – ie. testing desktop vs. mobile.
After

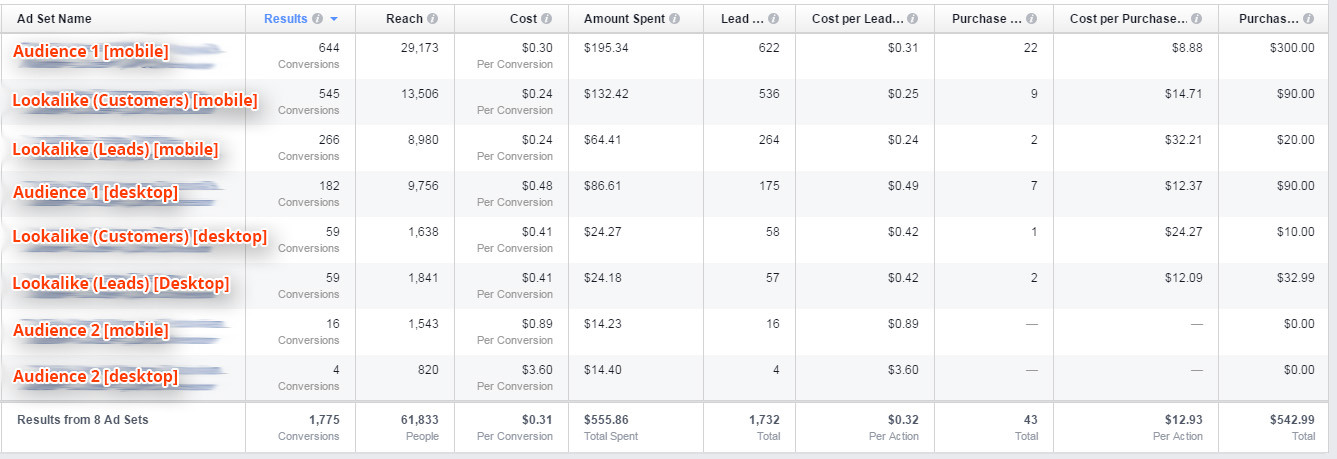
Note: If you notice a little difference in the numbers from the “Overall” pic above, it’s because several of these ad sets are still live and some stuff changed between screen captures!
The image above shows all of the ad sets in the “After” campaign. Each ad set targeted a different audience and/or device/placement. We used the same ad (a boosted post [however, it was different than the ad used in the “Before” Campaign]) for all of our ad sets.
As you can see, we have two Lookalike audiences running – one that looks like our customers (people that have paid money) and one that looks like our leads (people that have joined the email list). These two ad sets have the lowest cost per lead at $0.24 and $0.25; however, you'll notice the front end purchase conversions are not as good as the first ad set (Audience 1 [mobile]) which is targeting a specific audience we created.
Alas, the point of these campaigns is to generate leads because the bulk of the money is to be made on the back end. We're simply tracking front end sales to make sure some purchases are happening!
Finally, I also want to draw attention to the fact that not all of our ad sets performed well. Look at the last two (Audience 2), we were spending between $0.89 and $3.60 per lead … of course, those ad sets were eventually shut off. It just goes to show that an “ad” isn't everything, targeting and placement are huge factors as well!
3 Changes We Made To Decrease Cost Per Lead By 88%
Time to get into the good stuff – the changes we made to the ads, presented in a way that will help you make similar changes!
1. Changed The Offer
I believe this change had the single biggest impact on our advertising.
The original offer presented people the opportunity to receive a product for free, as long as they covered the cost of shipping and handling. For example, we'll ship you this book for free, but you pay the $7 shipping and handling.
Instead, we bundled several products together and offered people the opportunity to participate in a monthly drawing for the bundle of products valued at around $100.
Now, people can opt-in for “free-free” as opposed to an opt-in for a “free plus shipping & handling”.
Takeaway: Instead of offering your audience a coupon or something where they still have to spend money to receive the benefit – what can you offer for “free-free”? (a chance to win a gift card or a product?)
Mega Tip!
We moved the “free plus shipping & handling” offer to the Thank You page which allowed us to make money on the front end!
2. Systematized Audience Targeting
Before we began helping this business with their Facebook marketing, their audiences were a random hodgepodge of interests, age groups, placements, etc.
There wasn't a consistent strategy.
We systematized it …
- We kept the same demographic information (age, gender, religion, income, etc) across all ad sets.
- We tested one interest at a time.
- We tested that interest on mobile news feed and desktop news feed.
- We spent roughly $20 before deciding to “kill” or keep an ad set – our criteria was 20% better/worse. For example, if Audience 1 on mobile performed 20% better than Audience 1 on desktop – we'd “kill” the desktop ad set.
By following this systematized strategy, we've stuck with 3 ad sets that have a cost per lead between $0.24 and $0.31.
3. Used Lookalike Audiences
Facebook offers some pretty nifty tools in their ads platform. One of these tools is their custom audience feature. This enables marketers the opportunity to create audiences, based on what pages people have viewed, whether they've purchased a product or not, and more! [Learn more]
For example, we created two custom audiences – one that contained all of our Leads (if they landed on our Thank You page, they were automatically added to our Leads audience) and one that contained all of our paying customers (we uploaded a list of email addresses for people that had purchased products from the store).
We then used the “Lookalike” function to create audiences that “looked like” our Leads audience and our Customers audience (ie. they had similar demographics, interests, etc as the people who were “proven” to convert!). We then targeted those lookalike audiences with our ads!
As you can see above, these two audiences have the lowest cost per lead and you can likely use Lookalike audiences in a similar way!
Other Key Takeaways
Below are a few other key takeaways that I want to point out that … if you're not doing already … will help you tremendously.
Optimize For Conversions
You HAVE to optimize your ads for conversions.
Ok, technically, you don't have to; however, Facebook gives you the option to do so and they do an excellent job in getting you the “cheapest” conversions possible. It's to your benefit to allow Facebook to do its job!
For more info, checkout my Case Study called Facebook Ads: Optimize for Conversions or Clicks or Engagment.
If you don't know how to set up conversion tracking, check out my Facebook Ads course by clicking here!
Test Different Ads
While I did not test different ads in the case study above, I highly recommend doing so because the ad is a HUGE factor with regard to getting clicks and, therefore, conversions.
Why didn't I test different ads? The company I was running the tests for spent a good chunk of change to have a “pretty” graphic developed and they wanted to use it. Thankfully, it was a great image and yielded great results – normally, I'd test multiple ads.
Step-By-Step
Did you grasp the ideas and concepts delivered in this post, but need help with the “how”?
No problem! I've got you covered!
I have a course called How To Increase Leads & Sales On Facebook With The Triple Threat Strategy to walk you step-by-step through the exact process I used in the case study above!
